[WordPress]メディアライブラリから画像を選べるカスタムフィールドを作成する
カスタムフィールドで画像を扱いたい!でもACFのようなプラグインには頼りたくない!って時に使える方法。
今回は例として、プラグインを用いて投稿にカスタムフィールドを追加するコードを紹介します。もちろん適宜読み替えてもらえればテーマのfunctions.phpからでも使用可能です。
サンプル
以下のgistにサンプルのプラグインを置いておきます。
投稿に画像を扱うカスタムフィールドを追加するサンプルプラグイン. GitHub Gist: instantly share code, notes, and snippets.
wp-content/plugins/の中にimagefieldというディレクトリを作成し、gistにあるimagefield.phpとimagefield.jsをその中に入れてプラグインを有効化すれば利用できます。
リビジョンを遡ると記事途中までのコードが見れるので、困ったら参考にしてください。
カスタムフィールドを作成する
まずは普通にプラグインを作って、テキストを扱うカスタムフィールドを作成します。 こちらについては特に変わったことはしていないので説明は省きます。 詳しくは以下のサンプルを見てください。
投稿に画像を扱うカスタムフィールドを追加するサンプルプラグイン Step1
今回はpost投稿タイプにimagefieldというカスタムフィールドを追加します。
プラグインでカスタムフィールドを追加しているので投稿本文に値を表示するためにthe_contentフィルタを使っていますが、テーマでカスタムフィールドを追加する場合はそのまま表示したい場所でget_post_meta使えばいいです。
画像のIDを扱う
編集画面にJavaScriptを読み込む
編集画面でJavaScriptを利用するので、プラグイン内にある.jsファイルを編集画面で読み込ませるようにします。
admin_enqueue_scriptsというactionにて、投稿タイプがpost、表示しているphpファイルがpost.phpもしくはpost-new.phpのときだけプラグインのディレクトリ直下のimagefield.jsを登録します。
もしテーマのディレクトリ直下にあるファイルを登録したいならplugin_dir_url(__FILE__)をget_template_directory_uri()に変えてください。
add_action('admin_enqueue_scripts', 'add_imagefield_scripts');
function add_imagefield_scripts($hook_suffix){
    global $post_type;
    if ($post_type == 'post' && in_array($hook_suffix, array('post.php', 'post-new.php'))) {
        wp_enqueue_script('imagefield-script', plugin_dir_url(__FILE__) . '/imagefield.js');
    }
}add_action('admin_enqueue_scripts', 'add_imagefield_scripts');
function add_imagefield_scripts($hook_suffix){
global $post_type;
if ($post_type == 'post' && in_array($hook_suffix, array('post.php', 'post-new.php'))) {
wp_enqueue_script('imagefield-script', get_template_directory_uri() . '/imagefield.js');
}
}「画像を選択」ボタンを配置する
編集画面の表示領域に使用されるHTMLに<input type="button" .../>を配置します。
// 編集画面の表示領域に使用されるHTML
function insert_imagefield() {
    global $post;
    $imagefield = get_post_meta($post->ID, 'imagefield', true); ?>
    <div>
        <input type="text" name="imagefield" id="imagefield_input" value="<?php echo $imagefield; ?>"/>
        <input type="button" value="画像を選択" onclick="imagefield_selectImage()"/>
    </div>
<?php }
メディアライブラリを開く
imagefield.jsに以下のコードを配置します。
function imagefield_selectImage() {
    let frame = wp.media({
        title: "画像の選択", // メディアライブラリ上部に表示されるタイトル
        multiple: false, // 複数選択可能にするか
        library: {type: "image"} // 画像のみ
    });

    frame.on('select', function() { // 画像が選択されたとき
        // 選択された画像の情報を取得
        let image = frame.state().get('selection').first().toJSON();

        // 画像のIDをimagefieldのテキストフィールドに格納
        document.getElementById("imagefield_input").value = image.id;
    });

    frame.open();
}メディアライブラリはbackbone.jsを使って書かれており、wp.mediaという関数でインスタンスを簡単に作成できます。
実行結果は以下のようになるはず。
IDから画像を取得して表示
最初はカスタムフィールドの値をそのままテキストとして投稿本文末尾に表示していましたが、そこを変更します。 カスタムフィールドの値をIDとして画像を取得し、imgタグで表示します。
// 投稿内容の末尾にカスタムフィールドの内容を追加
add_filter('the_content', 'add_imagefield_content', 1);
function add_imagefield_content($content) {
    $id = get_post_meta(get_the_ID(), 'imagefield', true);
    if ($image = wp_get_attachment_image($id, 'large')) {
        $content .= '<h2>Imagefield</h2>';
        $content .= $image;
    }
    return $content;
}get_post_metaで取得した値をwp_get_attachment_imageに一旦渡すようにしただけで、特に難しいところもないはず。
以下のように画像が表示されるようになるはずです。
カスタムフィールドの見た目を調整する
ボタンとIDが表示されるだけなので、これを調整します。
phpファイル内の編集画面の表示領域に使用されるHTMLと、画像が選択されたときのjavascriptを以下のように書き換えてください。
// 編集画面の表示領域に使用されるHTML
function insert_imagefield() {
    global $post;
    $imagefield = get_post_meta($post->ID, 'imagefield', true);
    $imagesrc = wp_get_attachment_image($imagefield, 'small') ?>
    <div>
        <style>#imagefield_preview img { max-width: 8rem; max-height: 8rem; margin: .5rem; }</style>
        <input type="hidden" name="imagefield" id="imagefield_input" value="<?php echo $imagefield; ?>"/>
        <div id="imagefield_preview"><?php echo $imagesrc; ?></div>
        <input type="button" value="画像を選択" onclick="imagefield_selectImage()"/>
    </div>
<?php } frame.on('select', function() { // 画像が選択されたとき
// 選択された画像の情報を取得
var image = frame.state().get('selection').first().toJSON();
// 画像のIDをimagefieldのテキストフィールドに格納
document.getElementById("imagefield_input").value = image.id;
// プレビューに画像のsrcをセット
var preview = document.getElementById("imagefield_preview");
var previewImage = image.sizes.small || image;
preview.innerHTML = '<img src="' + previewImage.url + '"/>';
});テキストフィールドはjavascriptで書き換えるためユーザーに見せる必要も編集させる必要もないので、typeをhiddenにします。
あと、プレビュー用にimgタグを用意して、phpとjavascript両方で画像を表示するようにします。
ちなみに、今回は量が少ないので適当にstyleタグを間に入れてますが、cssを別ファイルから読み込みたい場合はjavascriptを読み込んだときと同じadmin_enqueue_scriptsのaction内でwp_enqueue_styleを使用してください。
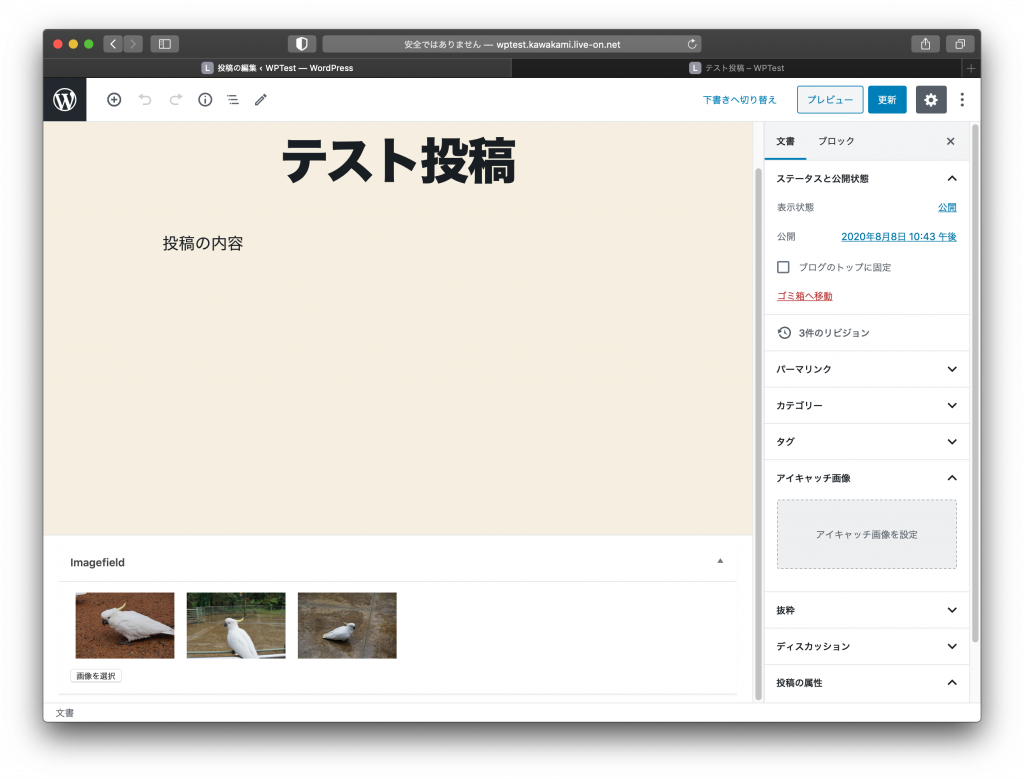
カスタムフィールドがこうなります。
複数の画像に対応する
画像を複数選べるようにしたい場合は、以下のように書き換えてください。
メディアライブラリから複数の画像を取得する
imagefield.jsを以下の内容に変更
function imagefield_selectImage() {
    var frame = wp.media({
        title: "画像の選択", // メディアライブラリ上部に表示されるタイトル
        multiple: true, // 複数選択可能にするか
        library: {type: "image"} // 画像のみ
    });

    frame.on('open', function() { // メディアライブラリが開かれたとき
        var selection = frame.state().get('selection');
        document.getElementById("imagefield_input").value.split(",").forEach(function(id) {
            selection.add(wp.media.attachment(id));
        })
    });

    frame.on('select', function() { // 画像が選択されたとき
        // 選択された画像の情報を取得
        var images = frame.state().get('selection').toJSON();

        // 画像のIDをコンマ区切りにしてimagefieldのテキストフィールドに格納
        document.getElementById("imagefield_input").value = images.map(function(image) {
            return image.id;
        });

        // プレビューに画像をセット
        var preview = document.getElementById("imagefield_preview");
        preview.innerHTML = images.map(image => {
            var previewImage = image.sizes.small || image;
            return '<img src="' + previewImage.url + '"/>';
        }).join("");
    });

    frame.open();
}
frame.on('open', ...でメディアライブラリが開かれた時に、今までカスタムフィールドに存在した画像をメディアライブラリ内で選択するようにしたので、一部の画像を追加・削除することが簡単にできるようになってます。
あとはカスタムフィールドで保存する値を,(コンマ)で区切って格納し、プレビューに画像を並べて表示するだけです。
PHP側のプレビュー出力を調整
値を,(コンマ)で区切って画像を取得して表示
// 編集画面の表示領域に使用されるHTML
function insert_imagefield() {
    global $post;
    $imagefield = get_post_meta($post->ID, 'imagefield', true); ?>
    <div>
        <style>#imagefield_preview img { max-width: 8rem; max-height: 8rem; margin: .5rem; }</style>
        <input type="hidden" name="imagefield" id="imagefield_input" value="<?php echo $imagefield; ?>"/>
        <div id="imagefield_preview"> <?php
            foreach (explode(",", $imagefield) as $image) {
                echo wp_get_attachment_image($image, 'small');
            }
        ?></div>
        <input type="button" value="画像を選択" onclick="imagefield_selectImage()"/>
    </div>
<?php }
explodeで分割してからforeachするだけ。
投稿記事の表示を調整
プレビューと同様、値を,(コンマ)で区切って画像を取得して表示します。
// 投稿内容の末尾にカスタムフィールドの内容を追加
add_filter('the_content', 'add_imagefield_content', 1);
function add_imagefield_content($content) {
    $images = get_post_meta(get_the_ID(), 'imagefield', true);
    if ($images) $content .= '<h2>Imagefield</h2>';
    foreach (explode(",", $images) as $image) {
        $content .= wp_get_attachment_image($image, 'large');
    }
    return $content;
}
実装してみたらちゃんとなりました!!
作る幅が広がって楽しいです!!
これはリセットすることはできませんか?